Astro Python SDK
Tutorial
Getting started with the Astro Python SDK
This tutorial demonstrates how to use the Astro Python SDK through a simple ETL pipeline that you can run on your local machine. The pipeline you build will:
Extract a file from S3 into a Snowflake relational table.
Transform that table in Snowflake.
Load that transformed table into a reporting table in Snowflake.
Assumed knowledge
To get the most out of this tutorial, make sure you have a knowledge of:
Basic Python and SQL.
Airflow fundamentals, such as writing DAGs and defining tasks.
Prerequisites
To complete this tutorial, you need:
An AWS S3 account with a storage bucket. If you don’t already have an account, Amazon offers 5GB of free storage in S3 for 12 months. This should be more than enough for this tutorial.
A Snowflake Enterprise account. If you don’t already have an account, Snowflake has a free Snowflake trial for 30 days.
Python 3.
A local Airflow environment. You can use either Apache Airflow or the Astro CLI to run your environment. If you’re using the Astro CLI, we recommend creating a new Astro project for this tutorial.
Step 1: Set up your data stores
On your local machine create a file named
orders_data_header.csvwith the following data:order_id,customer_id,purchase_date,amount ORDER1,CUST1,1/1/2021,100 ORDER2,CUST2,2/2/2022,200 ORDER3,CUST3,3/3/2023,300
Upload
orders_data_header.csvto your S3 bucket.In Snowflake, create a new Worksheet and run the following SQL commands:
CREATE DATABASE ASTRO_SDK_DB;
CREATE WAREHOUSE ASTRO_SDK_DW;
CREATE SCHEMA ASTRO_SDK_SCHEMA;
Ensure that you have
ACCOUNTADMINpermissions for your newly created database.
Step 2: Set up your Airflow environment
Install the Astro Python SDK. If you are using Apache Airflow, run the following command to install the Python SDK and additional packages packages required for working with AWS and Snowflake.
pip install 'astro-sdk-python[amazon,snowflake]>=1.0'If you are using the Astro CLI, you can install these packages by adding the following line to the
requirements.txtfile of your Astro project:astro-sdk-python[amazon,snowflake]>=0.11
Create the necessary environment variables for running the Astro SDK. If you are using Apache Airflow, you can do this by running the following commands:
export AIRFLOW__CORE__ENABLE_XCOM_PICKLING=True
export AIRFLOW__ASTRO_SDK__SQL_SCHEMA=ASTRO_SDK_SCHEMA
Note:
AIRFLOW__CORE__ENABLE_XCOM_PICKLINGneeds to be enabled forastro-sdk-python. Read more: Airflow Core Enable XCOM PicklingIf you are using the Astro CLI, you can do this by adding the following text to your
.envfile:AIRFLOW__CORE__ENABLE_XCOM_PICKLING=True AIRFLOW__ASTRO_SDK__SQL_SCHEMA=ASTRO_SDK_SCHEMA
Note: If you’re running Airflow on macOS, you must additionally set the following environment variable (background):
shell export OBJC_DISABLE_INITIALIZE_FORK_SAFETY=YESStart Airflow. If you have an Apache Airflow environment, you can do this by running:
airflow standalone
If you use the Astro CLI, you can start a local Airflow environment by opening your Astro project and running:
astro dev start
Confirm that your environment is up and running by opening
http://localhost:8080/in a web browser.
Step 3: Create Airflow connections to data stores
Open the Airflow UI at
http://localhost:8080/Open to Admin > Connections.
Create a new connection with the following values:
Connection ID:
aws_defaultConnection type:
S3Extra:
{"aws_access_key_id": "<your_access_key>", "aws_secret_access_key": "<you_secret_access_key>"}
Connect Snowflake to Airflow
Click on the blue “+” icon to Add a new record
Connection Id:
snowflake_defaultConnection Type:
SnowflakeHost:
https://<account>.<region>.snowflakecomputing.com/. This is the URL where you can log into your Snowflake accountSchema:
ASTRO_SDK_SCHEMALogin:
Password:
Account:
Database:
ASTRO_SDK_DBRegion: (something like
us-east-1orus-central1.gcp)Role:
ACCOUNTADMINWarehouse:
ASTRO_SDK_DW
Step 4: Create and populate some tables in Snowflake
Let’s create some auxiliary tables in Snowflake and populate them with a small amount of data for our ETL example.
In your Snowflake Worksheet, create and populate a
customers_table. We will join this table with an orders table that we create with the Astro Python SDK:CREATE OR REPLACE TABLE customers_table (customer_id CHAR(10), customer_name VARCHAR(100), type VARCHAR(10) ); INSERT INTO customers_table (CUSTOMER_ID, CUSTOMER_NAME,TYPE) VALUES ('CUST1','NAME1','TYPE1'),('CUST2','NAME2','TYPE1'),('CUST3','NAME3','TYPE2');
Create and populate a reporting table. This is where we’ll merge our transformed data:
CREATE OR REPLACE TABLE reporting_table (
    CUSTOMER_ID CHAR(30), CUSTOMER_NAME VARCHAR(100), ORDER_ID CHAR(10), PURCHASE_DATE DATE, AMOUNT FLOAT, TYPE CHAR(10));

INSERT INTO reporting_table (CUSTOMER_ID, CUSTOMER_NAME, ORDER_ID, PURCHASE_DATE, AMOUNT, TYPE) VALUES
('INCORRECT_CUSTOMER_ID','INCORRECT_CUSTOMER_NAME','ORDER2','2/2/2022',200,'TYPE1'),
('CUST3','NAME3','ORDER3','3/3/2023',300,'TYPE2'),
('CUST4','NAME4','ORDER4','4/4/2022',400,'TYPE2');
Step 5: Write a DAG for a simple ETL workflow
Use your favorite code editor or text editor to copy-paste the following code into a .py file in your project’s dags directory:
from datetime import datetime

from airflow.models import DAG
from pandas import DataFrame

from astro import sql as aql
from astro.files import File
from astro.sql.table import Table

S3_FILE_PATH = "s3://<aws-bucket-name>"
S3_CONN_ID = "aws_default"
SNOWFLAKE_CONN_ID = "snowflake_default"
SNOWFLAKE_ORDERS = "orders_table"
SNOWFLAKE_FILTERED_ORDERS = "filtered_table"
SNOWFLAKE_JOINED = "joined_table"
SNOWFLAKE_CUSTOMERS = "customers_table"
SNOWFLAKE_REPORTING = "reporting_table"


@aql.transform
def filter_orders(input_table: Table):
    return "SELECT * FROM {{input_table}} WHERE amount > 150"


@aql.transform
def join_orders_customers(filtered_orders_table: Table, customers_table: Table):
    return """SELECT c.customer_id, customer_name, order_id, purchase_date, amount, type
    FROM {{filtered_orders_table}} f JOIN {{customers_table}} c
    ON f.customer_id = c.customer_id"""


@aql.dataframe
def transform_dataframe(df: DataFrame):
    purchase_dates = df.loc[:, "purchase_date"]
    print("purchase dates:", purchase_dates)
    return purchase_dates


dag = DAG(
    dag_id="astro_orders",
    start_date=datetime(2019, 1, 1),
    schedule_interval="@daily",
    catchup=False,
)

with dag:
    # Extract a file with a header from S3 into a temporary Table, referenced by the
    # variable `orders_data`
    orders_data = aql.load_file(
        # data file needs to have a header row
        input_file=File(
            path=S3_FILE_PATH + "/orders_data_header.csv", conn_id=S3_CONN_ID
        ),
        output_table=Table(conn_id=SNOWFLAKE_CONN_ID),
    )

    # Create a Table object for customer data in our Snowflake database
    customers_table = Table(
        name=SNOWFLAKE_CUSTOMERS,
        conn_id=SNOWFLAKE_CONN_ID,
    )

    # Filter the orders data and then join with the customer table,
    # saving the output into a temporary table referenced by the Table instance `joined_data`
    joined_data = join_orders_customers(filter_orders(orders_data), customers_table)

    # Merge the joined data into our reporting table, based on the order_id .
    # If there's a conflict in the customer_id or customer_name then use the ones from
    # the joined data
    reporting_table = aql.merge(
        target_table=Table(
            name=SNOWFLAKE_REPORTING,
            conn_id=SNOWFLAKE_CONN_ID,
        ),
        source_table=joined_data,
        target_conflict_columns=["order_id"],
        columns=["customer_id", "customer_name"],
        if_conflicts="update",
    )

    purchase_dates = transform_dataframe(reporting_table)

    # Delete temporary and unnamed tables created by `load_file` and `transform`, in this example
    # both `orders_data` and `joined_data`
    aql.cleanup()
Step 6: Run the code
In the Airflow UI, you should see a DAG called
astro_orders. Make it active by clicking the slider next to its name: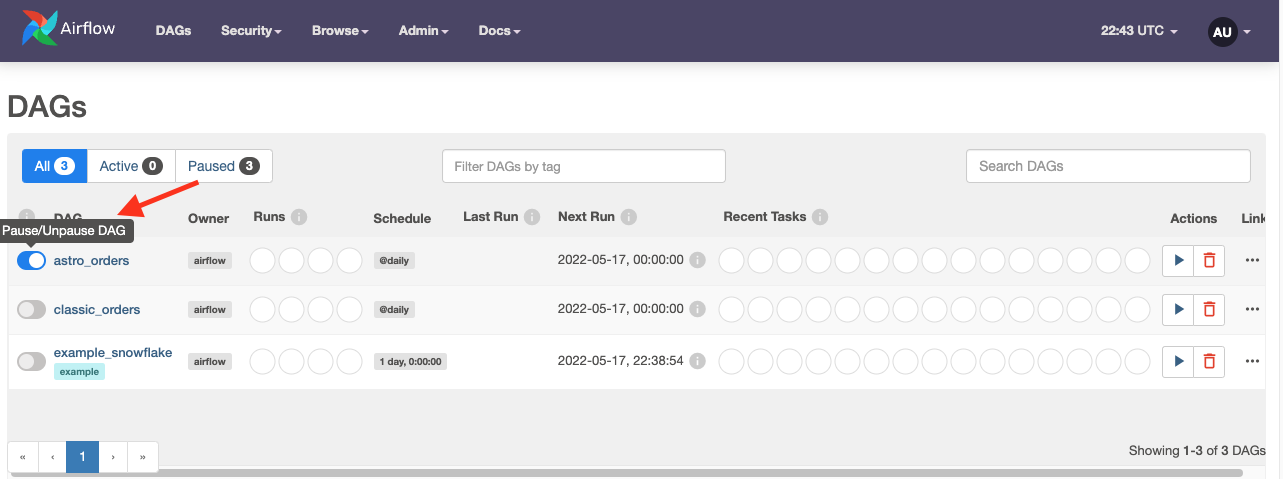
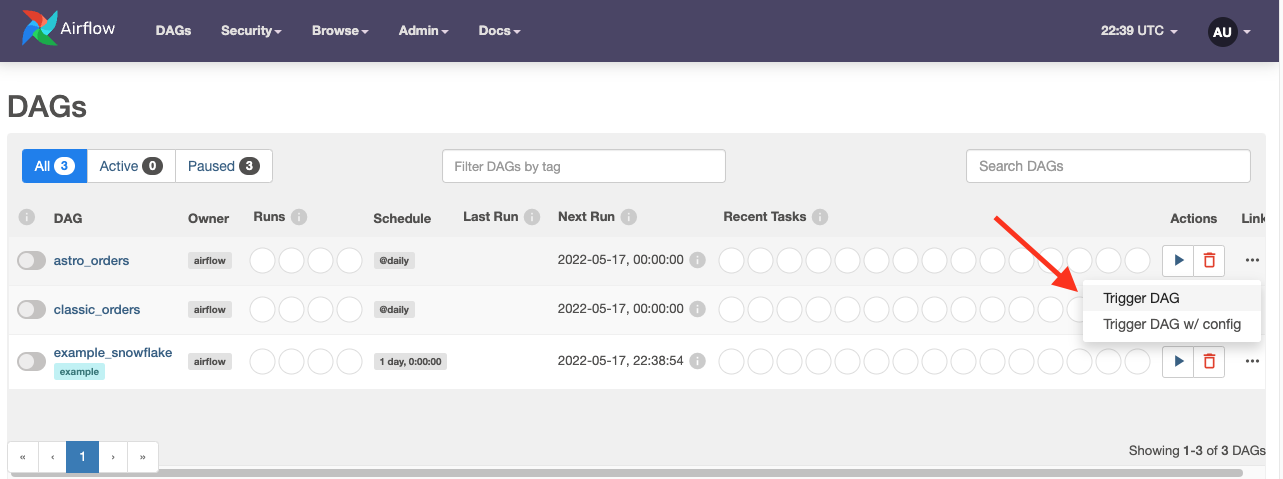
Click the play button next to the DAG’s name to run the DAG:
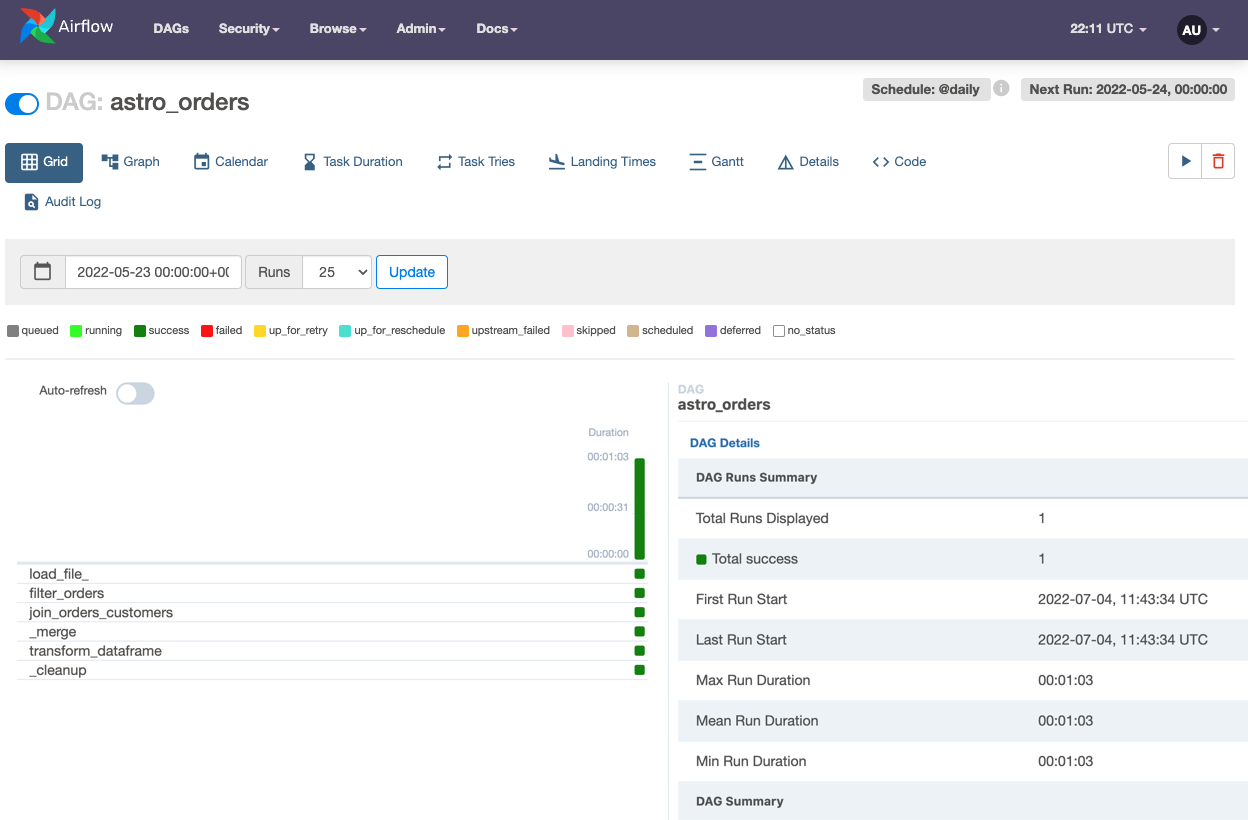
Click the DAG’s name to see how it ran in the Grid view:
How does it work?
The example DAG uses the TaskFlow API and decorators to define dependencies between tasks. If you’re used to defining dependencies with bitshift operators, this might not look familiar. Essentially, the TaskFlow API abstracts dependencies, XComs, and other boilerplate DAG code so that you can define task dependencies with function invocations.
The Astro SDK takes this abstraction a step further while providing more flexibility to your code. The most important details are:
Using
aqldecorators, you can run both SQL and Python within a Pythonic context. In our example DAG, we use decorators to run both SQL queries and Python codeThe Astro SDK includes a
Tableobject which contains all of the metadata that’s necessary for handling SQL table creation between Airflow tasks. When aTableis passed into a function, the Astro SDK automatically passes all connection, XCom, and metadata configuration to the task.The example DAG demonstrates one of the key powers of the
Tableobject. When we calledjoin_orders_customers, we joined two tables that had different connections and schema. The Astro SDK automatically creates a temporary table and handles joining the tables.The Astro SDK can automatically convert to SQL tables to pandas DataFrames using the
aql.dataframe, meaning you can run complex ML models and SQL queries on the same data in the same DAG without any additional configuration.
Now that you understand the core qualities of the Astro SDK, let’s look at it in the context of the example DAG by walking through each step in our ETL pipeline.
Extract
To extract from S3 into a SQL Table, we only need to specify the location of the data on S3 and an Airflow connection for the destination SQL table in Snowflake.
# Extract a file with a header from S3 into a temporary Table, referenced by the
# variable `orders_data`
orders_data = aql.load_file(
    # data file needs to have a header row
    input_file=File(path=S3_FILE_PATH + "/orders_data_header.csv", conn_id=S3_CONN_ID),
    output_table=Table(conn_id=SNOWFLAKE_CONN_ID),
)
Because we don’t want to keep the content of orders_data after the DAG is completed, we specify it without a name. When you define a Table object without a preexisting name, that table is considered a temporary table.
The Astro SDK deletes all temporary tables after you run aql.cleanup in your DAG.
Transform
We can filter our loaded table from S3 and join it to a Snowflake table with single line of code. The result of this function is a temporary table called joined_data:
@aql.transform
def filter_orders(input_table: Table):
    return "SELECT * FROM {{input_table}} WHERE amount > 150"


@aql.transform
def join_orders_customers(filtered_orders_table: Table, customers_table: Table):
    return """SELECT c.customer_id, customer_name, order_id, purchase_date, amount, type
    FROM {{filtered_orders_table}} f JOIN {{customers_table}} c
    ON f.customer_id = c.customer_id"""


# Create a Table object for customer data in our Snowflake database
customers_table = Table(
    name=SNOWFLAKE_CUSTOMERS,
    conn_id=SNOWFLAKE_CONN_ID,
)


# Filter the orders data and then join with the customer table,
# saving the output into a temporary table referenced by the Table instance `joined_data`
joined_data = join_orders_customers(filter_orders(orders_data), customers_table)
Because we defined customers_table, it is not considered temporary and will not be deleted after running aql.cleanup.
Merge
To merge our processed data into a reporting table, we call the aql.merge function:
# Merge the joined data into our reporting table, based on the order_id .
# If there's a conflict in the customer_id or customer_name then use the ones from
# the joined data
reporting_table = aql.merge(
    target_table=Table(
        name=SNOWFLAKE_REPORTING,
        conn_id=SNOWFLAKE_CONN_ID,
    ),
    source_table=joined_data,
    target_conflict_columns=["order_id"],
    columns=["customer_id", "customer_name"],
    if_conflicts="update",
)
aql.merge is database agnostic. It automatically handles all background XComs and configuration that are required when working with tables from separate sources.
Dataframe transformation
To illustrate the power of the @aql.dataframe decorator, we simply convert our reporting table to a simple dataframe operation:
@aql.dataframe
def transform_dataframe(df: DataFrame):
    purchase_dates = df.loc[:, "purchase_date"]
    print("purchase dates:", purchase_dates)
    return purchase_dates
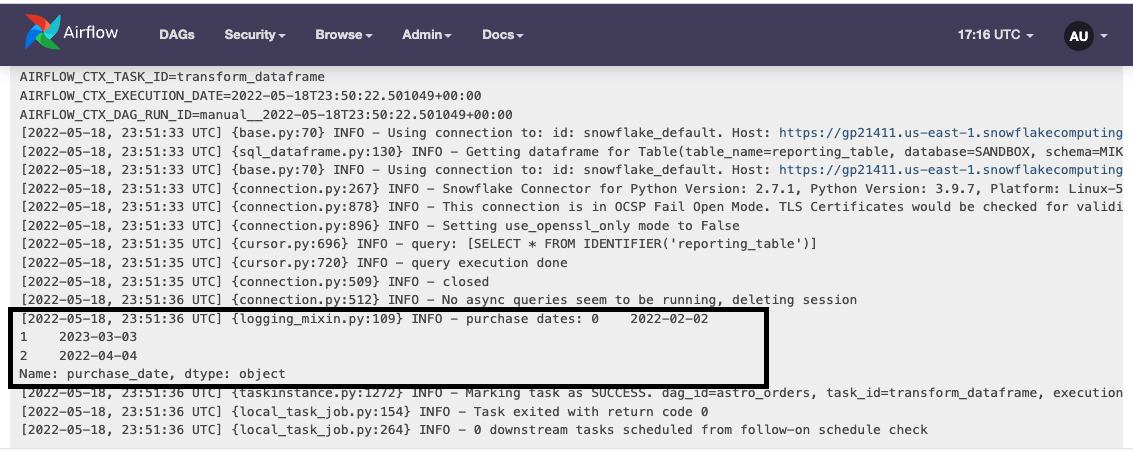
You can find the output of this function in the logs of the final task:
Clean up temporary tables
Temporary tables can be created by setting table.temp=True when defining a Table object, or by simply not defining a Table outside of a function. Because we created a few temporary tables in the DAG, we need to delete them at the end of the DAG.
You can clean up temporary tables in one of two ways:
Delete all temporary tables using an
aql.cleanup()function:# Delete all temporary aql.cleanup()
Specify a subset of temporary tables to be deleted:
aql.cleanup([orders_data, joined_data])
# Alternative syntax:
[orders_data, joined_data] >> aql.cleanup()
In all scenarios, even if the user gives a non-temporary table, only temporary tables will actually be deleted.
Tying Astro SDK decorators to traditional Airflow Operators
Operators that pass data that can be picked up by astro functions
Operators that don’t pass any data but you want to run upstream of a task
Scenario 1: Operators that pass on data to astro sdk tasks
When passing operators that return Xcom-based data, you can just pass those values
into the astro-sdk function using the .output function (or just using the output for values
created with the taskflow API)
@task
def get_num_rows():
    return 5


@aql.transform
def get_rows(table: Table, name: str, num_rows: int):
    return "SELECT * FROM {{table}} WHERE name={{name}} LIMIT {{num_rows}}"


with dag:
    name_from_env = BashOperator(...)
    get_rows(table=Table(), name=name_from_env.output, num_rows=get_num_rows())
Scenario 2: Operators that dont pass on data to astro sdk tasks
When tying traditional tasks to astro-sdk decorators, you might run into a situation where the original operators
might not pass any data. In these cases you can use the upstream_tasks function to set up dependencies between
traditional airflow tasks and Astro SDK tasks
@aql.transform
def get_rows(table: Table, num_rows: int):
    return "SELECT * FROM {{table}} LIMIT {{num_rows}}"


with dag:
    bash_command = BashOperator(...)
    get_rows(table=Table(), num_rows=5, upstream_tasks=[bash_command])